Python Tutorial – Basic Commands and Libraries
This compact Python tutorial shows how to get started with Python programming. Part 1 explains required tools, how to create and run scripts and notebooks, then basic Python syntax using examples: variables, operators and expressions, conditional statements, loops, data structures, functions and classes. Part 2: Package management describes how to install, update and uninstall Python packages using the package management systems pip and conda. Part 3: Libraries introduces libraries used for data analysis NumPy, Matplotlib, Pandas, then libraries used for Machine Learning, Scikit-Learn, Keras, Tensorflow.
Motivation
Python is one of the most widely used programming languages
with many areas of application:
➔ in basic education as the first programming language,
➔ at universities for teaching and research in the fields of data analysis and cyber security,
➔ in Machine Learning projects, where Python offers support through a wide range of libraries.
There are a variety of reasons to use Python:
➔ Python is easy to read and understand, making it a good choice for beginners.
➔ Python can be used procedurally or in an object-oriented way.
Beginners may start with procedural Python and use classes and inheritance later, when their projects get bigger.
➔ Development environments
such as Visual Studio Code or the web-based Jupyter Notebook are light-weight and user-friendly.
➔ Python offers extensive and free libraries
for data science, cryptography and other fields.
To run the code examples, use your current Python installation or choose one of the many available online Python environments. This Python tutorial is available online on Google Colab.
Overview
| Top |
1. Prerequisites: Installation and Tools
Visual Studio Code Spyder Jupyter Notebook Anaconda pip conda
In order to write Python code, you need: 1. a current Python installation, 2. a Python development environment (IDE),
3. additional libraries / packages, depending on the task to be programmed.
1. Python installation: Python can be downloaded from the Python website python.org, the installation is straight-forward, after
which the interactive Python console can be used.
2. Python IDE: Python development environments such as Visual Studio Code, Spyder
or PyCharm
and many others bundle required functionality for writing, debugging and running Python programs.
3. Libraries: Python packages are installed using the command-line packaging tools
pip or conda.
Pip works only for Python, while Conda works for other languages too, such as the statistical language R.
If you prefer to use a graphical user interface for package management,
the web-based packet manager Anaconda is a good choice.
1-1 Python IDEs
VS Code, Spyder, PyCharm
For the development of larger data science projects, the package management platform Anaconda and the development and runtime environments Spyder, Visual Studio Code or PyCharm can be used, which provide extensive functionality for package management, software development and presentation.
Visual Studio Code
Microsoft's Visual Studio Code is a minimalist development environment that supports different programming languages across platforms, including Python. The appropriate support is installed here through extensions. In particular, the Jupyter extension was installed for this tutorial in order to be able to structure the code into code blocks and run them separately in the interactive console. Development in Visual Studio Code is folder-based, i.e. you create a folder and scripts that belong together in it.
Spyder
Spyder is a Python development environment used primarily in data analysis projects. The current Spyder version 5.x has a modernized and more user-friendly interface compared to the previous version 4.0. Development in Spyder is project or folder based, meaning you can organize multiple Python scripts either in a project or as a loose collection in a folder.
1-2 Web-based tools
Jupyter Notebook, Google Colab
There are several light-weight web-based Python environments that can be installed locally or used in the cloud.
Jupyter Notebook
Jupyter Notebook is a web-based environment that supports the interactive creation, documentation and sharing of Python scripts, especially in the field of data science. In a Jupyter Notebook you can write and run code, visualize data, and also share this code with others. What is special about Jupyter Notebook is that code and documentation are written in independent cells, so that individual blocks of code can be executed individually. Depending on the context, the Jupyter Notebook is the web-based environment in which the notebooks are created, modified and run, or the interactive document ("Notebook", "Jupyter Notebook") that you have created in it. Jupyter Notebooks have the file extension ipynb, e.g. Python-Tutorial.ipynb. If you open an *.ipynb file with a simple text editor such as Notepad++, you will see that it is a JSON file, a human-readable data exchange format that is widely used in web applications for data storage.
Google Colab
Google Colaboratory is a web-based Python environment provided by Google that supports data science projects for free, and is essentially an enhanced version of Jupyter Notebook. Students and data scientists use it because no installations are required, and you get free GPU for ressource-intensive training tasks.
| Top |
2. First Steps in Python
Module *.py Notebook *.ipynb help import --version pip IndentationBefore programming, it is useful to know how to write and run Python scripts or Jupyter notebooks, as well as some system commands to get further information and help.
2-1 Create a Python script or Jupyter Notebook
A Python script or program consists of a single text file with the extension *.py, for example HelloWorld.py, also called a Python module, which contains contains the statements of the program as well as comments. A Jupyter Notebook has the ending *.ipynb, for example HelloWorld.ipynb and is created using the Jupyter Notebook web-app.
2-1 Hello World in Python
This minimal Hello World program contains single-line comments (introduced with #), and a print-statement. A Hello-World program is the smallest runnable program in a programming language and prints the text "Hello World" to default output (here: the console).
# (2) First lines in Python# (2-1) Hello World program in Pythonprint("Hello World!")"Hello World!"
Larger Python programs are organized in multiple source code files ("modules"), stored in packages or folders, and use functions or classes for their internal structure.
2-2 Run a Python script
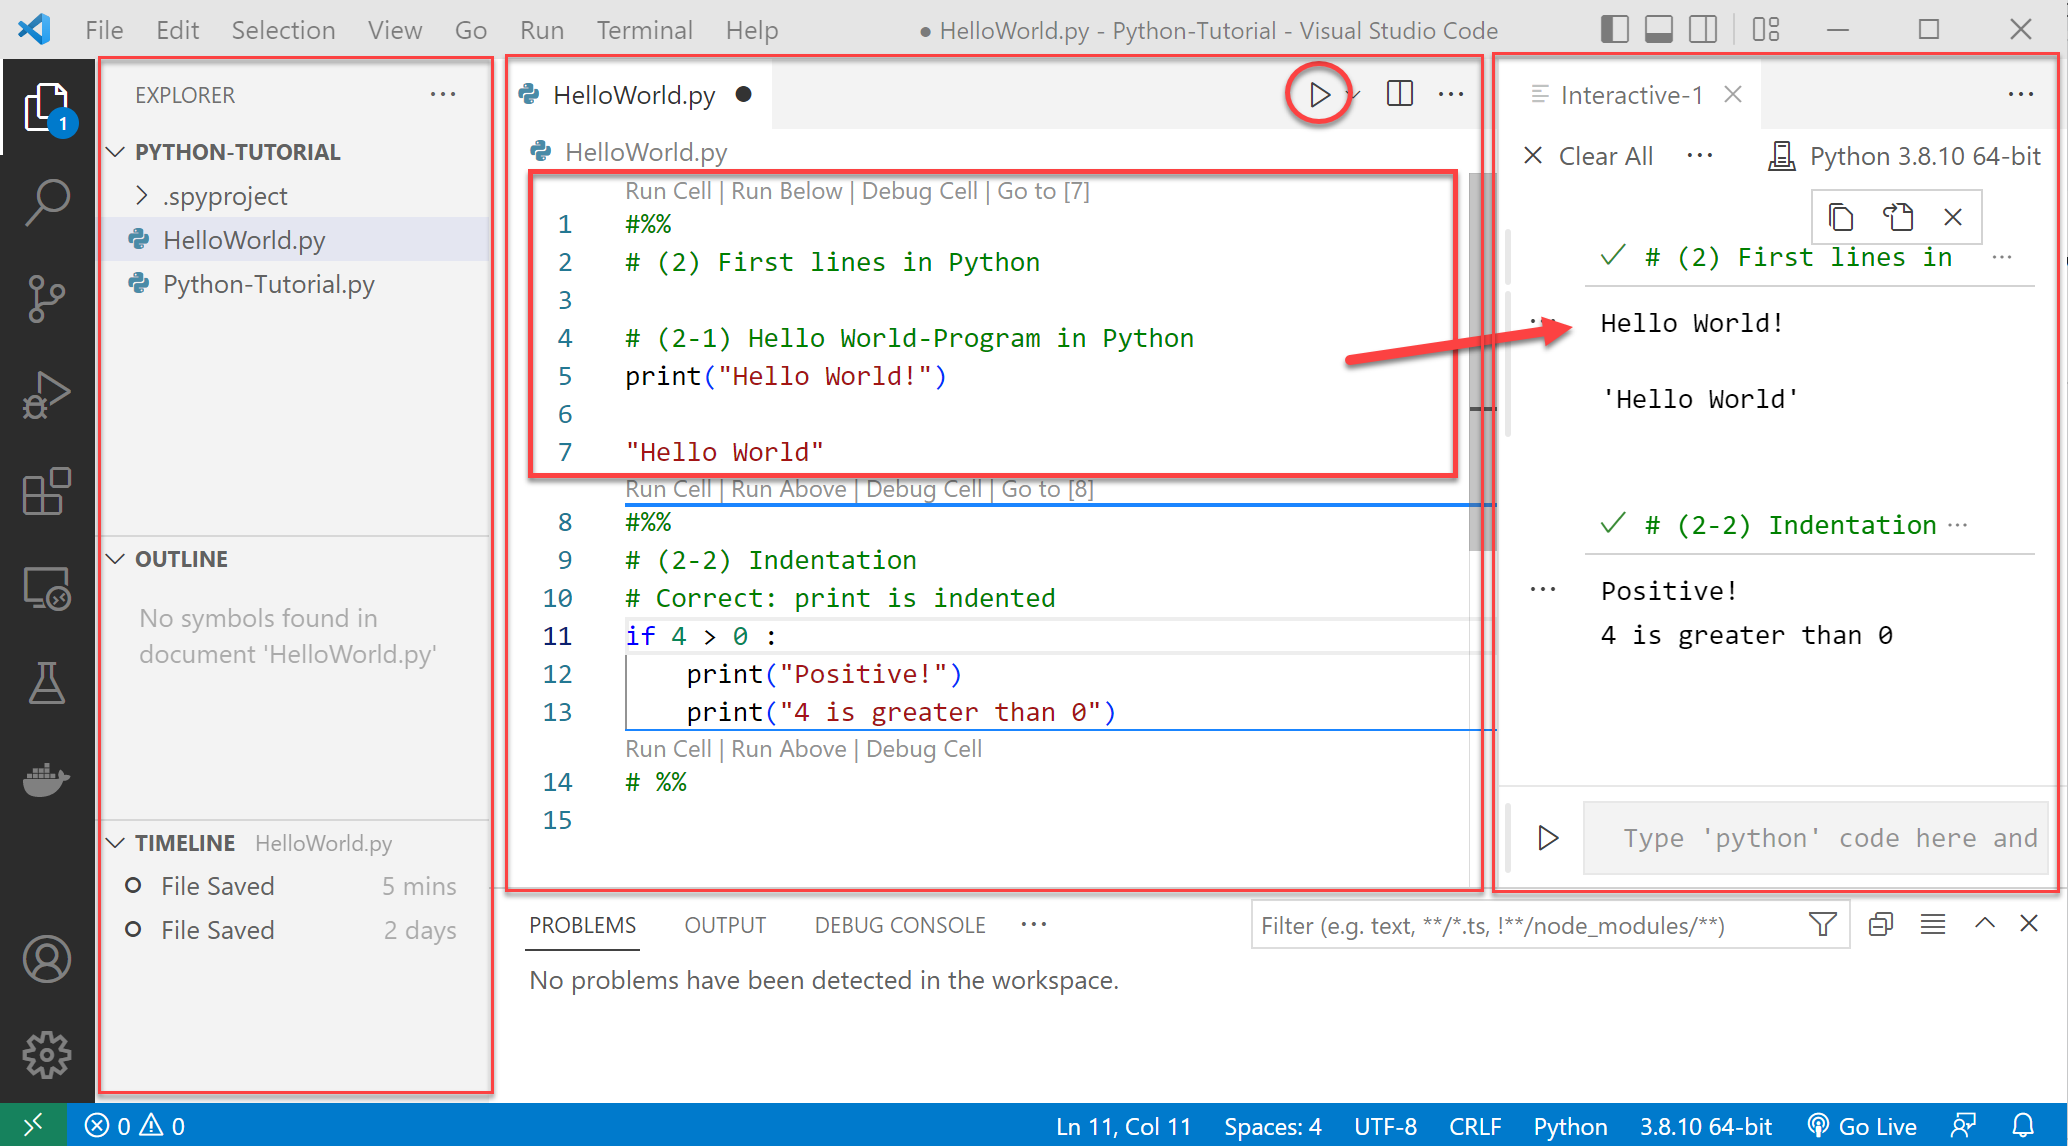
To run a Python program from Python source code, you need a Python interpreter. Development environments for Python such as Visual Studio Code, Spyder, PyCharm or Jupyter Notebook contain a Python interpreter and support the coding workflow with syntax highlighting, debugging functionality, etc.
A development environment such as the depicted Visual Studio Code typically has a default configuration of views / panels that support the development process: a file or project browser, a source code editor with syntax-highlighting and auto-completion, different panels for output, problems, console etc. You can run the entire script, or, if it is structured in code cells, you can run only the selected cells.
| Top |
2-3 Useful tools and system commands
Help and import
With the help-function you get help on syntax, functions and packages from Pythons built-in help system. Just put the name of the function or package in round brackets. With the import statement you import entire packages, e.g. import pandas or selectively classes / functions / constants from packages, e.g. from numpy import linspace.
help(print)import pandashelp(pandas)from numpy import linspace, arangehelp(linspace); help(arange)
Find out Python and packages version
Knowing your version of Python and installed packages is important to prevent compatibility issues in your code.
Find out Python version from command line
Firstly, you can find out the version of your Python installation from the command line (cmd.exe).
python --version
Find out Python version in your code
Secondly, you can find out the version of your Python installation from within your Python code by using the function python_version() from the package platform
from platform import python_version
python_version()
Find out version of installed packages
Finally, you can find out the versions of your installed packages using Python's packet management system pip: pip list gives you a list of all installed packages, pip install package_name installs a package, pip install package_name --upgrade upgrades a package to the last version
pip list
pip install package_name --upgrade
2-4 Statements and comments
A Python program is made up of statements and comments. Statements are: variable declarations, assignments, calculations, conditional statements, loops, function calls.
Comments
Python comments improve the comprehensibility of source code. Single-line comments begin with a "#" symbol followed by text. Multi-line comments must be surrounded by three double quotation marks at the beginning and end. If your Python script respects the usual programming conventions (variable and functions are named as what they are or do), it is sufficient to comment function definitions and complex parts of the code.
# Single-line comment# Another comment"""Mult-linecomment"""
Indentation
Python uses indentation and spaces to define blocks of code, i.e. to indicate related commands. Related code blocks typically appear in multiline commands such as in if-else, in loops, functions or classes. For example, the print-statements following the colon in line 2 belong to the if-part of an if-else statement and must be indented with the same number of spaces. The default number of spaces used for indentation is 4, but any number of spaces can be used, for example 2 or 3 is also allowed.
# Correct: line 3 and 4 are indentedif 4 > 0:print("Positive!")print("4 is greater than 0")else:print("Negative!")
# Incorrect: line 4 is indented# only with 3 spacesif 4 > 0:print("Positive!")print("4 is greater than 0")else:print("Negative!")
3. Variables, Constants, Operators
Variables Data types Typecasting Calculations| Top |
A program usually takes input data (numbers or strings), processes them and returns output data. The data of the program are stored as variables, constants or literals. Calculations with these data are performed using a defined set of operators.
3-1 Declare variables
Variables are named memory locations in which the program's data is stored,for example name, year, x, y. The value of a variable can be changed and overwritten. Python has a built-in type inference, meaning that variables are declared as soon as they are assigned a value, e.g. x = 1, name = "HS KL".
Syntax
# Assignments: one per rowvarname = varvalue# Assignments: multiple per row# Assignments: use comma as separatorvarname1, varname2 = varvalue1, varvalue2
Example
Define variables by assigning values
# name has data type Stringname = "HS KL"# jahr has data type Integerjahr = 2022# Assignments: one per rowx = 1y = 2# or multiple per rowx, y = 1, 2 # x = 1, y = 2# Print variable values to standard outputprint(name, "\n", jahr, "\n", x, y)
The data type (integer, floating point number, string, etc.) of the variable is assigned automatically by Python and can be found out using the type statement.
3-2 Declare constants
A constant is a named memory space whose value should not be reassigned. Different from C and Java, Python has no syntactic support for constants such as a const keyword or preventing reassignment. Common practice is to use a variable with capital letters as constant, or to define all needed constants in a separate Python script, so as to make sure that their value is not reassigned accidentally.
Syntax
# Assignments: one per rowCONSTNAME = constvalue# Assignments: multiple per row# Assignments: use comma as separatorCONST1, CONST2 = constval1, constval2
Example
Define constants in their own module
Here we create a file myconstants.py in folder mypkg, where all our constants will be stored.
# mypkg/myconstants.pyMY_PI = 3.14MY_E = 2.71
# myscript.pyfrom mypkg import myconstantsprint(myconstants.MY_PI)
Yet another workaround for using constants in Python is to define a tuple data structure that contains the needed constants, as described in section 7-2.
| Top |
3-3 Data types and typecasting
Python uses internally data types for integers (int), floating point numbers (float), truth values (bool), characters and character strings (str), as well as data structures for lists and sets. Different from C or Java, there is no data type double, instead, floats are stored using double precision (64 bit).
The data type of a variable is usually specified implicitly when a value is assigned, but it can also be specified explicitly by typecasting if required, by writing the desired data type in front of the name of the value and enclosing it in parentheses, e.g. x = float(5) or x = str("Hello!").
Syntax
# Specify data type explicitly
varname = datatype(varvalue)
# Find out data type of varname
type(varname)
Example 1
Numeric variables and typecasting
# Data type of variable x ...# ... is implicitly intx = 5print(type(x)) # Output: class'int'# Data type of variable x ...# ... is set explicitly to floatx = float(5)print(type(x)) # Output: class'float'
Example 2
String variables
The data type String describes texts or sequences of characters. For a string x you get the first element with x[0], the last element with x[-1], the characters from i inclusive to j exclusive with x[i:j].
x = "Hello!"print(x[0]) # Hprint(x[-1]) # !print(x[1:6]) # ello!print(x[-4:-1]) # lloprint(len(x)) # length = 6x = " Hello from Kaiserslautern "print(x.strip()) # Strip blank spaces
3-4 Operators and calculations
Calculations are performed by linking variables to expressions using operators (+, -, *, /, %, ...), taking into account the priority of the operators.
Python has operators for abbreviating assignment (+=, *= etc.), comparison operators (==, !=, >, <, >=, <= ) and logical operators (&&, ||, !). When evaluating an expression that involves comparison or logical operators, the result is one of the boolean values, i.e. True or False.
Example 1
Calculate expressions using different operators
In this synthetic example we calculate expressions using different operators: abbreviating assignment (+=, *=), modulo (%), division (/) and integer division (//).
a, b, c = 25, 3, 0 # a = 25, b = 3, c = 0# Abbreviating assignmenta += 1 # a = 26b *= 2 # b = 6# Modulo-operatorc = 17 % 5; # c = 2# Division with and without restres = a / b + a // b # res = 4.33 + 4 = 8.33print("a = %d, b = %d, res = %.2f" % (a, b, res));# Comparison and logical operatorscond1 = (a == (b + 20)) # True: 26 = 6 + 20cond2 = (a < b) # False: 26 is not less than 6cond = cond1 and cond2print(cond1, cond2, cond) # True False False
Example 2
Calculate the area of a triangle with sides a, b, c
Here we calculate the area of a triangle with sides a, b, c. We need the sqrt-function from math package to calculate the square root of an expression.
import matha, b, c = 10, 20, 20S = (a + b + c) / 2F = math.sqrt(S*(S-a)*(S-b)*(S-c))print("Area =", F)
4. Output and Input
print end sep Formatted output input| Top |
The results of a Python script are printed to standard output via the print-function. Standard output for a script is the console or, in a Jupyter Notebook, the area below a cell. For reading input from the console in a Python script, you can use the input-function.
4-1 Output with print()
In Python, output to the console is done using the print function, which has two optional parameters: sep and end, used to specify a separator for the objects and an end character. For formatted output, variables can be inserted into a formatting character string using format characters, in a C-like style.
Syntax
Print a list of objects with separator and end
print(object1, ..., objectn, sep = ';', end = '');
Formatted output (C-Style)
print(formatting_string % (variable_list))
Formatted output with print and format
print(formatting_string.format(variable_list))
Example 1
Output objects using sep and end
# Output: 5;20.5 // 5:20.5x, y = 5, 20.5print(x, y, sep=';', end=' // ')print(x, y, sep=':')
Example 2
Formatted output
Each data type has appropriate formatting characters: %d or %i for int (integers), %f for float (single-precision floating-point), %lf for double (double-precision floating-point).
# Output: x=5, y=20.5, sum=25.50x, y = 5, 20.5sum = x + y# (1) Formatted output of a textprint("x=" + str(x) + " y=" + str(y) + " sum=" + str(sum))# (2) Formatted output with placeholder (C-Style)print("x=%d, y=%.1f, sum=%.2f" % (x, y, x + y))# (3) Formatted output with formatprint("x={0:d}, y={1:.1f}, sum={2:.2f}".format(x, y, x+y))
4-2 Input with input()
Input from the Python command console or in a Jupyter Notebook cell is done using the "input()" function. The command x = input() creates an input field, and whatever you type in it is stored in the variable x. In order to interprete input as a specific data type, it must be converted using an appropriate function (e.g. int() or str()).
Syntax
input()
# Print prompt text, then read input in next line
print(prompt_text)
var = datatype(input())
# Prompt text and input in same line
var = datatype(input(prompt_text))
Example 1
Prompt text and input on different lines
In this example, two numbers are entered, one integer and one float.
# Read input from consoleprint("Enter an integer number")x = int(input())print("Enter a decimal number")y = float(input())# Formatted outputprint("Your input: x = %d, y = %f" % (x, y))
Example 2
Prompt text and input in same line
This is the same example as before, written in a more concise form.
# Read the input from consolex = int(input("Enter a number: "))y = float(input("Enter another number:"))# Formatted outputprint("Your input: x = %d, y = %f" % (x, y))
5. Conditional Statements
if elif else| Top |
A conditional statement is a control structure that determines which of two (or more) blocks of statements, depending on one (or more) conditions. In Python, as in most programming languages, it is realized via the if-else statement.
5-1 If-else statement
The if-else statement is a multiline statement that is executed as follows:
if condition1 is true, then execute statements1,
else if condition2 is true, then execute statements2,
and so on.
The elif keyword in Python means: "if the previous conditions don't apply, try this condition"
and the else keyword catches everything that isn't caught by the previous conditions.
Syntax
If-else Statement
if condition1:statements1elif condition2:statements2[...] # Add elif-branches as neededelse:default_statementsprint('Done!')
Example
Calculate an interest rate depending on amount of money
What interest rate is calculated for amount = 20000?
amount, rate = 10000.0, 0.0if amount > 50000:rate = 1.0elif amount > 10000:rate = 0.5elif amount > 0:rate = 0.2else :rate = -0.2print(rate)
5-2 Match case-statement
The match-case statement is used when there are many different cases and the implementation via if-elif-elif-elif...else statement would be cumbersome. It is similar to the switch-case statement provided by C-like languages, with additional support for matching patterns, hence the different name.
Syntax
match-case
The match-case statement compares the value of an expression to the values or patterns specified in the different case-blocks. From all the specified cases, only the first matching case is executed. A match statement usually contains a default case specified with underscore, that is executed when none of the cases match.
match expr:case value1:# Do somethingcase value2:# Do something else[...] # More casescase _:# Provide a default case
Example
Print a text message according to user input
In this example the user is asked to make a choice by typing a number. The program then prints a message according to the number that has been entered.
ch = int(input("Enter a choice: 1, 2 or 3: "))match ch:case 1:print("First choice")case 2:print("Second choice")case 3:print("Third choice")case _:print("Invalid choice!")
6. Loops
while for in range break continue| Top |
Loops are used for program flow control, so that statements can be executed repeatedly, as long as an execution condition is met. Python has two loop commands: while loop and for loop. For additional control of the loop execution, the command break and continue are used: break allows you to exit a loop if a given condition is fulfilled, with continue you can skip loop steps depending on a condition.
6-1 While Loop
A while loop allows statements to be executed repeatedly, as long as an execution condition is met.
Syntax
while condition :
  statements
Example 1
Print list of students
The counter variable that is queried (here: "i") in the condition must incremented explicitly in the loop body (here: i+=1), else the loop condition will be always true and the execution of the loop will not stop until your script runs out of memory.
students = ["John Doe", "Jane T.", "Mad Max"]i = 0while i < len(students):print(students[i])i+=1
Example 2
Calculate sum of first numbers using while
n = 5sum = 0 # This variable will store the sumi = 1 # Initialize counting variable iwhile i <= 5:sum += i # Add counting variable to sumi += 1 # Increment counting variableprint("Sum = ", sum)
Example 3
Infinite loop stopped with break
counter = 1while (True):print(counter, ':')counter += 1if (counter == 10):break
6-2 For-Loop
For loops are used to iterate over the elements of a sequence (list, tuple, set, etc.). The syntax of the for loop requires to use the member operator "in".
C-like for loops that specify a start and end condition and an increment for a counter variable must be rewritten in Python using the range() function, as in the example below. This type of for loop is used less often in Python, since you often work with objects and, as in Example 1, you can use the in operator to iterate over the elements of a list or set.
Syntax
# Using iterator
for element in list:
    statements
# Using a counter variable and range()
for i in range(n):
    statements
Example 1
Print list of students
students = ["John Doe", "Jane T.", "Mad Max"]for std in students:print("Student: " + std)
Example 2
Calculate sum 1 + 2 + ... + 5
n = 6sum = 0for i in range(1,n):sum += iprint("Sum = ", sum)
Example 3
For-loop with continue
With continue you can skip loop steps depending on a condition. In this example, we skip all students whose names start with 'J'.
students = ["John Doe", "Jane T.", "Mad Max"]for std in students:if (std.startswith('J')):continueprint(std)
7 Data Structures
List Dictionary Tuple Set| Top |
While variables store single data objects like numbers or strings, a data structure stores multiple data objects,
and has operations so that these data can be manipulated (stored / retrieved / updated) efficiently.
Python provides a number of built-in data structures: List, Dictionary, Tuple and Set,
that can store objects of any data type, each with its own set of operations / methods.
7-1 Lists
Lists are ordered and changeable collections of objects that allow duplicate members.
Create lists
Lists can be created in different ways: (1) by explicitly enumerating the elements, (2) by using a loop in which the elements are appended using append() and insert(), and (3) in a shorthand way by list comprehension.
Method 1: Create list by explicit enumeration
For creating a list using explicit enumeration, put the comma-separated elements in square brackets []. This method is only suitable for small lists with a few values.
a = [1, 4, 9, 16, 25]print(type(a)) # Output: class 'list'print(a) # Output: [1, 4, 9, 16, 25]
Method 2: Create list using list and append
First, an empty list is created using list(). Next, additional values are added to the end of the list with append() or inserted at a specific index using insert(). List elements can be removed using the function remove().
a = list() # Create an empty listfor x in range(1, 6):a.append(x**2) # Append elementsa.insert(2, 14) # Insert 14 at index 2print(a) # Output: [1, 4, 14, 9, 16, 25]
Method 3: Create list using list comprehension
List comprehension is a compound statement in which the definition of the list elements, the for-loop to be executed and an optional condition are specified in a single line. List comprehension is used as a shorthand way to create a list with abbreviated syntax: you write the operation to be performed on each element directly in the square brackets, followed by the for loop.
# List comprehensiona = [x**2 for x in range(1, 6)]print(a) # Output: [1, 4, 9, 16, 25]# List comprehension with conditiona = [x**2 for x in range(1, 6) if x % 2 == 0]print(a) # Output: [4, 16]
Yet another way of creating lists is by means of a list generator, which is useful for creating large lists with many elements. The syntax is exactly like list comprehension, only with round brackets instead of square brackets. The difference between list lomprehension and list generator is that comprehension creates the entire list immediately and stores it in memory, while a list generator only creates the elements that are currently needed, thereby saving memory.
import itertools# Create list using list generatora = (x**2 for x in range(1, 6))# Next line will show the type of the generated objectprint(a) # Output: <generator object <genexpr> at ...># Create an iterator for accessing the listiterator = itertools.islice(a, 6)for el in iterator:print(el, end=", ")
Access list elements
List elements can be accessed using an index or using an iterator.
Access list using index
List elements can be selected using an index indicating the item's position in the list. The expression mylist[1:3] selects all elements with index ≥ 1 and < 3 (slicing).
mylist = ["John D.", "Jane T.", "Max M."]print(mylist) # ['John D,', 'Jane T.', .Max M.']# Assignment: Max is replaced by Miamylist[2] = "Mia F." # Assignmentprint(mylist[0]) # John D.print(mylist[-1]) # Mia F.print(mylist[1:3]) # ['Jane T.', 'Mia F.']
Access list using iterator
List elements can be accessed using an iterator, either implicitly through for-loop and "in"-operator, or by explicitly creating an iterator with iter and looping through it.
mylist = ["John D.", "Jane T.", "Max M."]# Loop through list using iterator implicitlyfor el in mylist:print(el, end=", ")print()# Loop through list using iterator explicitlyiterator = iter(mylist)for el in iterator:print(el, end=", ")
List operations
Lists support linked list operations such as append, insert, remove, index, stack operations such as pop, and functions for sorting, counting elements etc.
- pop: remove last element of the list
- count: count occurences of element in list
- sort: sort list in ascending order
Example: List operations
This example shows how to use the list functions sort, pop and how to concatenate list elements to a single string by means of the join function, with semicolon as separator.
mylist = ["John D.", "Jane T.", "Max M."]mylist.sort()print(mylist) # ['Jane T.', 'John D.', 'Max M.']mylist.pop() # ['Jane T.', 'John D.']print(mylist)to_string = ';'.join([str(item) for item in mylist])print(to_string) # Jane T.;John D.
7-2 Dictionaries
Dictionaries are collections of key-value pairs ("items"), that are unordered and mutable. A dictionary is an associative array: it associates an unique key with an item. While in a regular array the values are indexed via an integer key, the index of a dictionary is a unique key that may be a number or a string.
Create dictionaries
Dictionarys can be created either by explicitly specifying key-value-pairs, or from existing lists of keys and values, by pairing the two lists using zip() and then creating a new dictionary using dict().
Example:
We create a dictionary for storing contacts and their phone numbers using different methods.
As keys we use the names, as values the phone numbers.
Method 1: Create dictionary by explicit enumeration
For creating a dictionary using explicit enumeration, place the comma-separated key-value pairs in
curly brackets {}.
Key and value of an item are separated by colon, key-value pairs by comma.
# Create dictionary by explicit enumerationmydict = {"John D." : "0171 876654","Anna T." : "0151 987654"}# Add a new key-value-pairmydict["Jane E."] = "0171 123456"# Update John's phone numbermydict.update({"John D.": "0171 67435"})print(mydict)
Method 2: Create dictionary using dict and assignment
First, an empty dictionary is created using the function dict(). Next, key-value pairs are added using the syntax dict_name[key] = value.
# Create dictionary using dict()mydic = dict()mydict["John D."] = "0171 876654"mydict["Anna T."] = "0151 987654"mydict["Jane E."] = "0171 123456"print(mydict)
Method 3: Create dictionary using dict and zip
Another method to create a dictionary in Python is by using the function zip to aggregate the elements of two lists into an iterator, which then is passed to the dict-constructor. The two lists should contain the keys and values for the dictionary.
keys = ['John D.', 'Anna T.', 'Jane E.']values = ['0171 876654', '0151 987654', '0171 123456']mydict = dict(zip(keys, values))print(mydict)
Method 4: Create dictionary using dict and fromkeys
Yet another method to create a dictionary in Python is by means of the method fromkeys, that takes as parameters a list of keys and a value that is set as default value for all keys.
keys = ['John D.', 'Anna T.', 'Jane E.']values = '020 *' # Default value, same for every keymydict = dict.fromkeys(keys, values)mydict['John D.'] = '020 8743 8000'print(mydict)
Access dictionary keys and values
Python dictionaries have a set of built-in methods that allow to access keys and values:
- get(key): get value by key, for example mydict.get("Anna T.")
- items(): return key-value pairs as list, for example mydict.items()
- keys(): return the keys, for example mydict.keys()
- values(): return the values, for example mydict.values()
mydic = dict()mydict["John D."] = "0171 876654"mydict["Anna T."] = "0151 987654"mydict["Jane E."] = "0171 123456"# Get value by keyannasNumber = mydict.get("Anna T.")print(annasNumber) # 0151 987654# Dictionary keys and valuesprint(list(mydict.keys())) # ['John D.', ...]print(list(mydict.values())) # ['0171 876654', ...]
Dictionary operations
Python dictionaries support all operations needed for manipulating the data that they store.
- update(): update the value for a given key
- pop(): remove an element for a given key from the dictionary
- popitem(): return and remove last inserted item, e.g. key-value pair
- clear() delete all items of the dictionary
Example: Dictionary operations
This example shows how to acces and update the values of a dictionary using an iterator and how to use the dictionary methods pop() and popitem().
mydict = dict()mydict["John D."] = "0171 876654"mydict["Anna T."] = "0151 987654"mydict["Jane E."] = "0171 123456"# Add country code to each itemiterator = iter(mydict)for key in iterator:mydict[key] = "040 " + mydict[key]print("With country code: ", mydict)# Retrieve and remove Anna's numberannasNumber = mydict.pop("Anna T.")print(annasNumber)print("After removing Anna", mydict)# Retrieve and remove last numberlastNumber = mydict.popitem()print(lastNumber)print("After removing last number", mydict)
7-3 Tuples
Tuples are ordered and immutable collections of possibly duplicate elements.
Create and access tuples
Since tuples are immutable, they are created by enumeration. For creating a new tuple, enclose a comma-separated list of values in round brackets (). The elements of a tuple then can be selected using their index, just as with lists.
Python does not support constants through a special keyword. Tuples lend themselves to be used as constants, since they are immutable and do not allow re-assignment of their values. This ensures that constants cannot be re-assigned by mistake.
Example: Create a singleton tuple for the constant PI
In this example we create a tuple with one value that defines the constant PI.
Instead of writing MY_PI = (3.14), it is also feasible to write MY_PI = 3.14, :
that is with a comma after the value. This comma is needed only for singleton tuples.
The assignment in line 4 generates an error because the elements of a tuple cannot be changed.
# Create a tuple for PIMY_PI = (3.14) # Tuple with one valueprint(MY_PI[0])MY_PI[0] = 3.14159 # Re-assignment leads to an error!print(MY_PI)
Example: Create a tuple with 2 values
In this example we create a tuple with two values for different precisions of PI.
Note that although the tuple is created using round brackets, the elements are accessed using
square brackets.
Also, it is permitted to omit the round brackets, as in
MY_PIS = 3.14, 3.14159.
# Create a tuple for different precisions of PI# Tuple with 2 valuesMY_PIS = (3.14, 3.14159)print(MY_PIS[0]) # 3.14print(MY_PIS[1]) # 3.14159
7-4 Sets
Sets are unordered collections of elements and do not allow for duplicate members.
Create sets
Sets can be created either by explicitly specifying a comma-separated list of its elements in curly braces, or from an existing list by using the function set().
Create set by explicit enumeration
set1 = {1, 2, 3, 4, "a", "b", "c"}set2 = {3, 4, 5, 6, "c"}set1.add(8) # add new elementset2.discard(6) # delete an elementprint(set1) # {1, 2, 3, 4, 8, 'a', 'b', 'c'}print(set2) # {3, 4, 5, 'c'}
Create set using set()-methd
In this example, a list is first declared, and then a set from the list using the set() method. Note that while the list contains the duplicate value 3, this has been removed from the set.
list = [1, 2, 3, 3]print(list) # Output: [1, 2, 3]set3 = set(list) # create a set from a listprint(set3) # Output: {1, 2, 3}
Set operations
Python's set is an implementation of the mathematical notion of a set and support operations such as union, intersection, difference.
set1 = {1, 2, 3, 4}set2 = {3, 4, 5, 6}# Unionu = set1.union(set2)print(u) # {1, 2, 3, 4, 5, 6}# Intersectionintersect = set1.intersection(set2)print(intersect) # {3, 4}# Differencediff = set1.difference(set2)print(diff) # {1, 2}
8 Functions
def return global docstring annotation lambda function| Top |
A function is a named block of code that runs only when used ("called"). Functions are defined once and can then be called any number of times.
You can pass data as parameters to a function, and a function can also return values.
A function parameter is an object placeholder listed in the function definition
and must be replaced with an actual value ("argument") when using the function.
Mostly we use functions written by others and available through packages.
For example, we use the sin()-function from the math package, or the read_excel()-function from the pandas package.
Self-written functions are useful for structuring larger scripts and for creating reusable pieces of code.
8-1 Define and use functions
A function first is defined by using the keyword def, followed by a function name (here: my_func) and a comma-separated list of parameters that is surrounded by round brackets. Parameters can be positional or keyword parameters. A function then is used / called where needed by specifying its name and a list of arguments.
Syntax
Definition and usage of a function
# Define the function my_funcdef my_func(param_1, param_2, ... param_n):# TODO: here goes the function body# Use the function my_funcmy_func(arg_1, arg_2, ..., arg_n)my_func(param_n = arg_n, ..., param_1 = arg_1)
Example: Function for prettifying output
Function separator_line()
In this example we define a function separator_line() for prettifying console output. The function has three parameters: symbol1, symbol2 and n, so that we can create separator lines with different symbols and different lengths.
# Define the function separator_linedef separator_line(symbol1, symbol2, n):print(symbol1*n, end = '')print(symbol2*n, end = '')print(' ')# Use the function separator_lineseparator_line('<', '>', 4) # Output: <<<>>>separator_line('*', '*', 3) # Output: ******
Positional and keyword arguments
In Python, function parameters are specified using position and / or keyword:
1. By position means: by providing argument values in the correct position of the list.
In this case, number and order of the arguments must match the parameter list:
separator_line('<', '>', 4).
2. By keyword means: by providing parameter name - parameter value pairs, then the order can be switched:
separator_line(symbol1='<', symbol2='>', n=4).
Variable scope
Any variable defined within a function is a local variable: it can be used only within that function.
Variables defined outside functions are called global variables,
they can be used in any function.
A global variable defined outside a function must be refered using the global-keyword
within the function, so that it can be used there.
Example
Global and local variables
This example defines a function counter(), that counts how often it has been called.
When calling the function the first time, it prints "1. Call", the second time, it prints "2. Call" and so on.
Line 1: The variable count is initialized with 0. It is a global variable, because it is defined outside
the function body.
Line 3: In the function body, refer to the global variable using the keyword global.
This way, you can change the value of the global variable in the function.
Line 4: Now we can change the value of the global variable count by incrementing it.
count = 0 # Global variabledef counter(param1 = '.Call'):global count # Declare count as globalcount = count + 1print(count, param1)counter() # Output: 1. Callcounter() # Output: 2. Callcounter() # Output: 3. Call
8-2 Functions with return value
Functions with return value calculate a new non-null value from their input parameters and return this value via the keyword "return". This value can be used in the calling function in further calculations. Many mathematical and statistical functions are of this type, they take one or more parameters as input and return a value, such as the sin-function: y = sin(x) or the two-dimensional function from the next example.
Syntax
Function with return value
# Define the function my_funcdef my_func(param_1, param_2, ... param_n):# TODO: enter your statements hereret = calculation involving param1 ...return ret# Use the function my_funcret1 = my_func(arg_1, arg_2, ..., arg_n)ret2 = my_func(arg_1, arg_2, ..., arg_n)
Example: Define a mathematical function
f(x,y) = sin(pi*x)*exp(-y), if x < 0
cos(pi*x)*exp(-y), if x > 0
In this example we define a mathematical function that returns different combinations of sin- and exp-function, depending on the sign of its first parameter x. The parameters x and y must be numbers: this function will not work for parameters x, y that are lists.
# (1) Define the function ffrom numpy import pi, sin, cos, expdef f(x, y) :z = 0if x > 0:z = sin(pi*x)*exp(-y)elif x < 0:z = cos(pi*x)*exp(-y)return z# (2) Use the function fz1 = f(1/4, 0); print("z1 = ", z1) # z1 = 0.70z2 = f(1/2, 1); print("z2 = ", z2) # z2 = 0.36z3 = f(0, 0); print("z3 = ", z3) # z3 = 0print ("z=", z) # Error, z is not defined!
In Python, if a function should accept list parameters, you must vectorize it first using NumPy's vectorize.
import numpy as np# Use vectorized form of function ffvec = np.vectorize(f)z = fvec([pi/4, pi/2], [1, 2]); print(z)
Lambda functions
Lambda functions are a type of inline functions that can be defined in just one line and used for small code fragments . Assume you need the function f(x) = sin(2*x)*exp(-x) repeatedly in your code. Instead of writing a multi-line regular function definition with def, you can just write the following one-line lambda function:
import mathf = lambda x: math.sin(2*x)*math.exp(-x)y1 = f(1.57); y2 = f(2);print(y1, y2)
8-3 Docstrings: Function comments
Functions should be commented using docstrings, so as to provide the necessary information about what the function does and how to use it. In Python, docstrings are created by enclosing a documentation text in three double quotes in the second line of the function definition, that is, after the colon. This docstring is read by the Python help system, and when you type help(function_name), is printed to standard output.
Syntax
Docstring
The general syntax for a docstring includes: (1) a short description of what the function does and (2) the role and data types of the parameters and return value.
# Define the function my_funcdef my_func(param_1, param_2, ... param_n):'''This function does this and that ...@param param1: represents this and that@return ret: the return value represents ...'''# TODO: enter your statements hereret = calculation involving param1 ...return ret
Example
Python Docstring, Doxygen-style
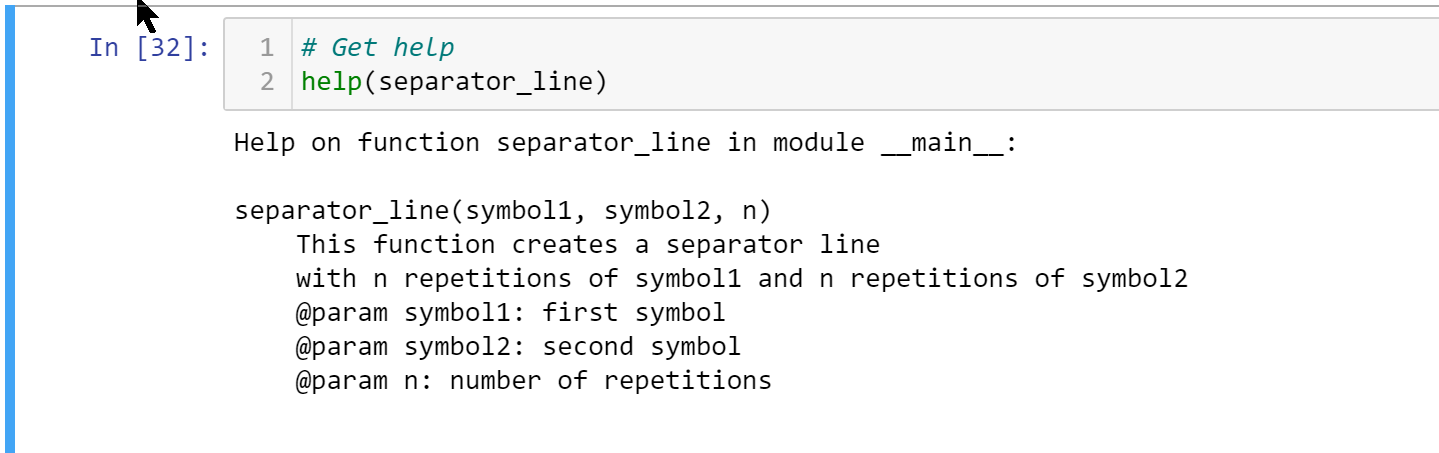
In this example we write a docstring for the function separator_line() and specify the parameters with Doxygen annotations.
# Define the function separator_linedef separator_line(symbol1, symbol2, n):'''This function creates a separator line withn times symbol1 and n times symbol2@param symbol1 (str): first symbol@param symbol2 (str): second symbol@param n (int): number of repetitions'''print(symbol1*n, end = '')print(symbol2*n, end = '')print(' ')# Get help on the functionhelp(separator_line)
8-4 Annotations
As an advanced feature, Python allows to add additional information to functions via annotations. Annotations can be used to specify the required data types for function parameters and return values. They do not enforce a given data type and are used only as a hint to the programmer. The annotations of a function are printed using the syntax function_name.__annotations__.
How to write annotations:
Parameter annotations: After each parameter, write a colon, followed by the annotation .
Return value annotation: After the parameter list, write an arrow "->", followed by the annotation.
The annotations must be a valid Python expressions.
Example
Function with annotations
In this example, we use annotations to specify the expected data type of the parameters and return value
of a function to_currency().
Specifically, we use the name of the required data type as annotation, but we could have also used string constants,
for example
def to_currency(amount: "integer", curr: "string") -> "string":
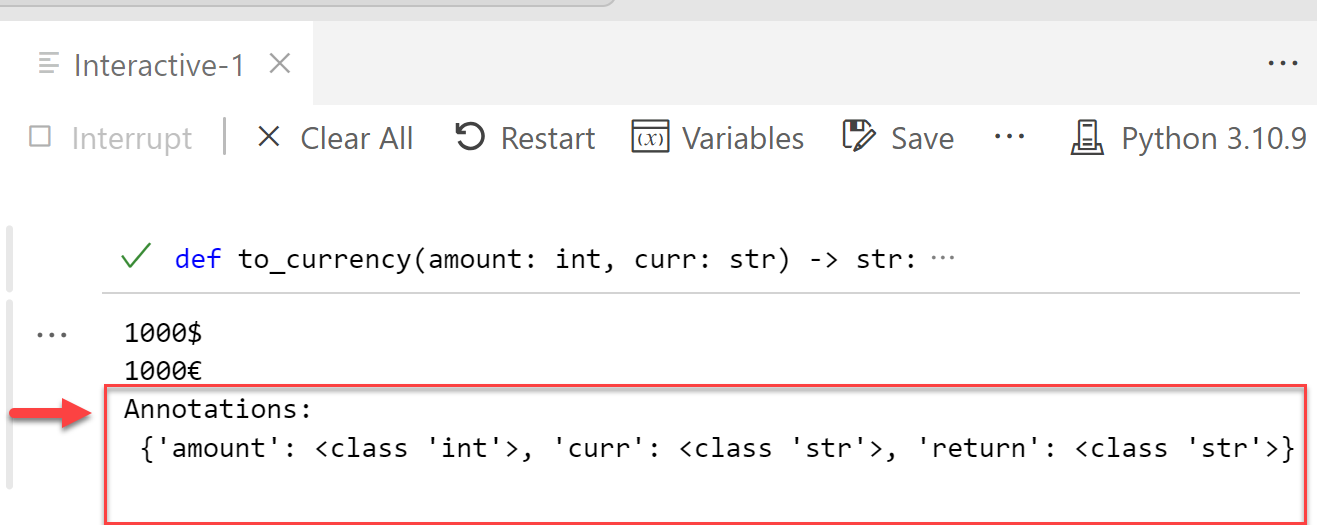
# Define the functiondef to_currency(amount: int, curr: str) -> str:'''Function returns amount formatted as currency@param amount: amount of money as integer@param currency: currency as string@return Returns amount + currency as string'''return str(amount) + curr# Use the functionprint(to_currency(1000, '$'))print(to_currency(1000, '€'))# Show the annotationsprint(to_currency.__annotations__)
Output in Visual Studio Code is as shown in the screenshot.
9 Classes and inheritance
class __init __ () self Base class Subclass Inheritance super()| Top |
Python is an object-oriented programming language, meaning that almost everything is a class with attributes and methods. The class is an object constructor for creating new objects of the same type. The class attributes are variables and the class methods are functions belonging to that class. Python classes are defined using the keyword class and by implementing an __init __ () method that is implicitly executed when creating a new class object.
9-1 Define and use classes
We define a class by using three keywords: class, self and pass, and one special function: __init __ ().
Syntax
* The __init __ () method is used to set object properties or perform other operations required when creating the object.
* The keyword self is a reference to the current instance of the class and is used to access class variables.
When defining methods for a class, you must specify self as the first parameter in the parameter list.
When calling class attributes and methods within a class definition, you write self. before the attribute or method name,
so as to specify that they belong to the current class.
* The keyword pass indicates that at the given place nothing happens.
This statement is used as a placeholder for future code. For example when you develop a new class and already write down the method names,
but not yet the actual implementations.
# (1) Define a classclass ClassName:def __init__(self, param1, ... paramn) :self.param1 = param2self.paramn = paramndef method1(self, param_list):# TODO: enter your statements herepassdef method2(self, param_list):# TODO: enter your statements here# (2) Use a classobject1 = ClassName(arg_list)object1.method1(arg_list); object1.method2(arg_list);object2 = ClassName(arg_list)
Example
Class Student
We declare a class Student, with which we want to create new Student objects. A student has the properties name and semester and two methods: inc_semester() that increases the semester, and display(), that displays the properties of a student.
(1) Define the class
* Line 3-5: The __init __ () function sets current values for name and semester.
* Line 6-7: The inc_semester() method increases the value of the attribute semester by 1.
* Line 8-10: The display()-method creates text output from the properties of the class object.
# (1) Define class Studentclass Student:def __init__(self, name, semester) :self.name = nameself.semester = semesterdef inc_semester(self):self.semester += 1def display(self):print("Student: " + self.name +", Semester: " + str(self.semester))
(2) Use the class
After defining a class, you can use it to create new class objects (here: new students) and manipulate their data (here: display and increase semester).
- * Line 2-5: Create a new class object std1, display it, increase the semester and display it again
- * Line 5-6: Create a new class object std2 and display it.
- * Line 7: Delete the class objects. The keyword "del" destroys the object and deletes it from memory.
# (2) Use class Studentstd1 = Student("Jane Doe", 1) # Create a new studentstd1.display() # Output: Student: Jane Doe, Semester: 1std1.inc_semester() # Increment the semester variablestd1.display() # Output: Student: Jane Doe, Semester: 2std2 = Student("Bart Simpson", 3) # Create another studentstd2.display() # Output: Student: Bart Simpson, Semester: 3del std1, std2 # Delete class instances
9-2 Class inheritance in Python
With class inheritance we can define classes that inherit all the methods and properties of another class.
The class that is inherited from is called the base class. The class that inherits properties and methods from the base class is called a subclass. In Python, a subclass is defined by placing the base class name in parentheses after the class name.
Example
Student inherits from Person
Persons have a name and a birth date. Students are Persons, that additionally have a semester, indicating in which term of their study they are.
(1) Define base class and subclass
How do we map this knowledge with classes and inheritance? We define a base class Person with attributes name and birthdate and a subclass Student with attribute semester. Since the subclass inherits the properties and functions of its base class, we do not have to redefine name and birthdate in the subclass, only the additional property semester and the additional method inc_semester().
- * Line 2-9: Define base class Person. The to_string()-method of the base class Person takes as parameter a label and builds a string output from the properties of the Person.
- * Line 11-19: Define subclass Student. In line 11, the initialization method of the base class is called with super.__init__(). In line 13, the property semester is set, which only belongs to the subclass.
- * Line 17-19: Define the to_string() method of class Student. Note that we have a to_string()-method in both base class and subclass. The method to_string() defined in the subclass calls the base class method with the same name using the super()-keyword and then appends the semester attribute to the string.
# Define base class Personclass Person:def __init__(self, name, birthdate):self.name = nameself.birthdate = birthdatedef to_string(self, label):mystr = label + ": " + self.namemystr += ", Birth date: " + self.birthdatereturn mystr# Define subclass Studentclass Student(Person):def __init__(self, name, birthdate, semester):super().__init__(name, birthdate)self.semester = semesterdef inc_semester(self):self.semester += 1def to_string(self, label):mystr = super().to_string(label)return mystr + ", Sem: " + str(self.semester)
(2) Use base class and subclass
After we have defined base class and subclass, we can use them to create new Persons and Students and manipulate their data.
# Use base class and subclasspers1 = Person("Alice First", "01.01.1980")# P1: Alice First, Birth date: 01.01.1980print(pers1.to_string("P1"))std1 = Student("Bob Second", "01.02.1990", 1)# S1: Bob Second, Birth date: 01.02.1990, Semester: 1print(std1.to_string("S1"))std1.inc_semester();print(std1.to_string("S1"))
| Top |
10 Python Libraries
Python has a built-in standard library (Python Standard Library), which is available immediately after installation and includes functions for mathematical / system / file access / encryption and other frequently needed tasks. Additionally, Python has many specialized libraries that provide functionality for data analysis and machine learning or cryptography.
| Top |
10-1 Install Python libraries
Python libraries that are not already included after installation must be installed using the package management tools pip or conda. Both are command-line tools operated via the Python console. While pip is mainly for Python package management, conda supports other languages such as the statistical programming langage R and, more importantly, supports environments. The syntax of the commands is similar, e.g. pip list (install, update, ...) or conda list (install, update, ...).
Package manager pip
Pip is Python's default package management system. The general syntax of a pip command is pip command [options] package.
Example: Manage packages using pip
This example shows how to use pip to list packages, show information for a specific package, install / update / uninstall a package.
pip listpip show numpy, pandaspip install pandaspip install numpy --updatepip uninstall numpy
Package manager conda
Conda is a Python management system that can be used for
installing and updating packages and also for managing application environments.
The general syntax of a conda command is conda command [options] package.
Example: Manage packages using conda
This example shows how to use conda to list packages and install / update / uninstall a package.
conda listconda install pandas # install into current environmentconda install --name myenv pandas #install into specified environmentconda update pandasconda remove pandas
Example: Manage environments using conda
Conda environments are directories that store specific versions of Python + libraries + dependencies as needed by different projects. Environments can be activated and deactivated, so that you can have setups for different projects in parallel and switch between them. In this example we create an environment called ML, activate it, install a special set of program packages into it, then deactivate it.
conda create --name MLconda activate MLconda install pandas tensorflow kerasconda deactivate ML
| Top |
10-2 Import Python libraries
Python libraries and functions are imported using the import command, using an abbreviated alias name, e.g. np for numpy, or plt for matplotlib. With the import statement you import entire packages, e.g. import pandas or selectively classes / functions / constants from packages, e.g. from numpy import linspace. In the following example, the packages NumPy and Matplotlib are each imported with an alias name, which must then be prepended to the function calls, e.g. np.linspace(), or plt.plot().
import numpy as npimport matplotlib.pyplot as pltx = np.linspace(0,10,40) # x-valuesy = np.sin(x); # y-valuesplt.plot(x, y,'r*', label='sin');
| Top |
10-3 Python libraries for data analysis
Frequently used Python libraries for data analysis and Machine Learning are:
- NumPy - provides support for creating and manipulating multidimensional arrays and random numbers
- Matplotlib - provides functions for data visualization
- Pandas - provides special data structures and methods for processing tabular data, e.g. Series, DataFrames
- Scikit-Learn - provides algorithms for Machine Learning, Classification, Regression
Part 2: Package management describes how to install, update and uninstall Python packages using the package management systems pip and conda. Part 3: Libraries introduces libraries used for data analysis such as NumPy, Matplotlib, Pandas, then libraries used for Machine Learning, such as Scikit-Learn, Keras, Tensorflow.
References and tools
- [1] Python Documentation at python.org: docs.python.org/3/tutorial/
- [2] Anaconda: anaconda.com/: package management system, also needed for installing Jupyter Notebook
- [3] PIP Packet Manager: pypi.org/project/pip/
- [4] Conda Cheatsheet: conda-cheatsheet.pdf
- [5] Visual Studio Code: code.visualstudio.com/
- [6] NumPy: numpy.org/ – Arrays, Random Number Creation
- [7] Matplotlib: matplotlib.org/ – Data Visualization, Plotting
- [8] Pandas: pandas.pydata.org/ – DataFrames, Series
- [9] Scikit-Learn: scikit-learn.org – Algorithms for Machine Learning